How to Create Labels With a Mail Merge in Word 2019
go.ncsu.edu/readext?809311
en Español / em Português
El inglés es el idioma de control de esta página. En la medida en que haya algún conflicto entre la traducción al inglés y la traducción, el inglés prevalece.
Al hacer clic en el enlace de traducción se activa un servicio de traducción gratuito para convertir la página al español. Al igual que con cualquier traducción por Internet, la conversión no es sensible al contexto y puede que no traduzca el texto en su significado original. NC State Extension no garantiza la exactitud del texto traducido. Por favor, tenga en cuenta que algunas aplicaciones y/o servicios pueden no funcionar como se espera cuando se traducen.
Português
Inglês é o idioma de controle desta página. Na medida que haja algum conflito entre o texto original em Inglês e a tradução, o Inglês prevalece.
Ao clicar no link de tradução, um serviço gratuito de tradução será ativado para converter a página para o Português. Como em qualquer tradução pela internet, a conversão não é sensivel ao contexto e pode não ocorrer a tradução para o significado orginal. O serviço de Extensão da Carolina do Norte (NC State Extension) não garante a exatidão do texto traduzido. Por favor, observe que algumas funções ou serviços podem não funcionar como esperado após a tradução.
English
English is the controlling language of this page. To the extent there is any conflict between the English text and the translation, English controls.
Clicking on the translation link activates a free translation service to convert the page to Spanish. As with any Internet translation, the conversion is not context-sensitive and may not translate the text to its original meaning. NC State Extension does not guarantee the accuracy of the translated text. Please note that some applications and/or services may not function as expected when translated.
Collapse ▲- Open a blank document in Microsoft Word.
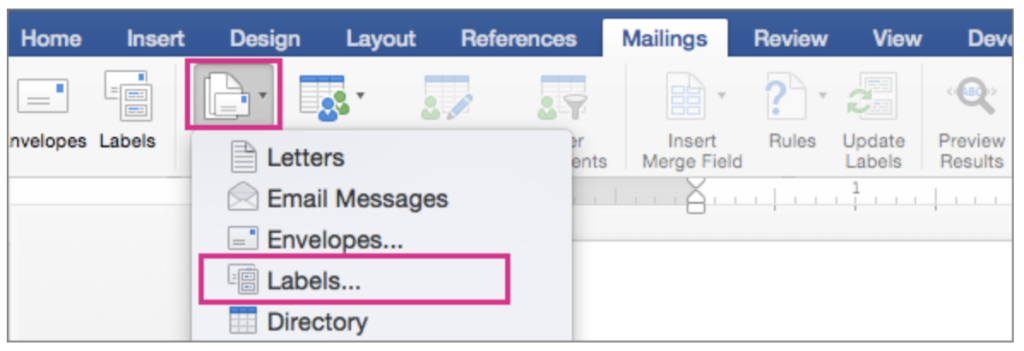
- Go to Mailings > Start Mail Merge > Labels.

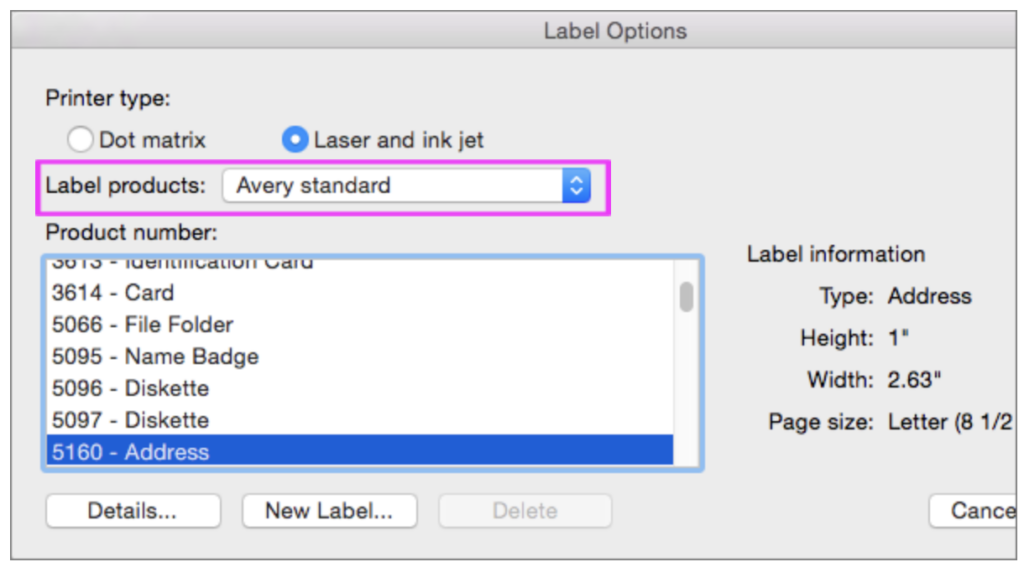
- In the Label Options dialog box, choose your label supplier in the Label products list.

- In the Product number list, choose the product number on your package of labels.
Tip: If none of the options match your labels, choose New Label, enter your label’s information, and give it a name. Choose OK to add the new label to the Product number list. - Select OK.
Your document now displays a table with an outline of the labels. If you don’t see the outline, go to Table Layout and select View Gridlines. - Go to File > Save to save your document.
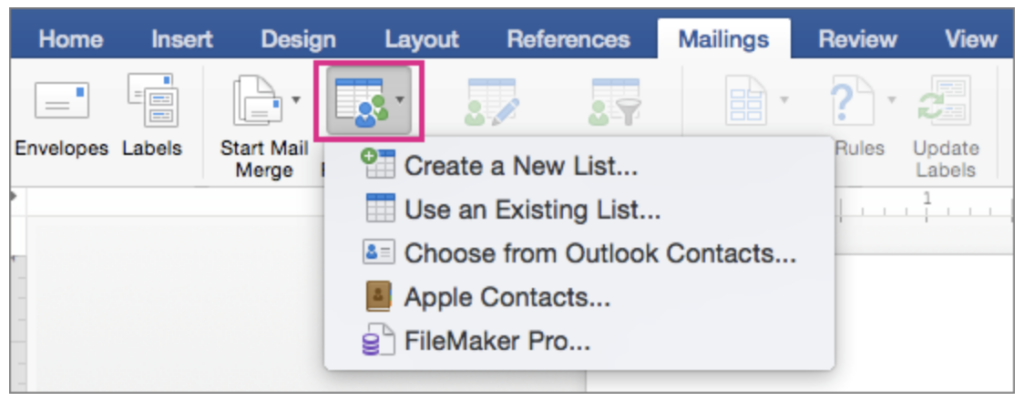
- Go to Mailings > Select Recipients, and then choose an option. If using an exported list from ActiveCampaign, choose “Use an Existing List.”
For more info, see Data sources you can use for a mail merge.

- Select OK.
If a window titled “File Conversion” pops up, just click OK. - Go to Mailings > Insert Merge Field and select the fields to show on your labels.

- Select OK.
- Format the fields in the first label so it looks the way you want the rest of your labels to look.
- Go to Mailings > Update Labels.
- Go to Mailings > Preview Results.

Choose Preview Results again to view, add or remove merge fields. Select Update labels when done if you make changes. - When the labels look the way you want, go to Mailings > Finish & Merge > Print Documents.
 Tip: To review and update each label individually before printing, go to Mailings > Finish & Merge > Edit Individual Documents. When you’re done, go to File > Print to print the labels.


